In today’s modern workplace, users can work from anywhere on any number of devices. To accommodate their employees, companies are trying to provide their users with access to all the services and tools that are critical to their roles. Two years into the pandemic, Pew research has found that nearly six in ten (59%) of individuals who say their job can be done remotely are working from home entirely or most of the time. Most of those individuals (83%) had already made the adjustment to working from home before the surge in cases seen around the Omicron variant. So where does that leave companies in their fight to both enable their users to do their jobs, while also protecting critical company data?
One of the first steps and one of the most robust options for companies who consume Microsoft’s services are Conditional Access Policies.
While the circumstances of each user logging in may be different, the need of those users to have a secure and safe connection to their cloud resources is constant. Microsoft has evolved their Conditional Access policies to keep up with the changing dynamic of the modern workforce, and even if your company has been using CA (Conditional Access) policies for years, I would recommend you take a moment to get caught up with the options and deployments being leveraged by companies across the cloud. The options and features you can utilize today are ever expanding, and the flexibility provided to your company while also ensuring increased security and compliance makes CA policies one of the most powerful tools in securing your cloud environment.
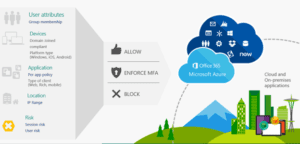
Each approach has its own design and nuances that need to be met, but they all share the same common language of security and risk reduction. As a rule of construction, when you start out creating a new policy, you should choose one of several initial conditions. These include:
- Users and user groups: To reduce the risk that sensitive data is leaked, define which users or user groups can access which applications or resources, paying careful attention to sources of highly sensitive information such as human resources or financial data.
- User Actions: Create policies based on specific actions of users, such as registering new devices.
- Sign-in risk: Azure AD (Active Directory) machine learning algorithms evaluate every sign-in and give it a risk score of low, medium, or high depending on how likely it is that someone other than the legitimate owner of the account is attempting to sign in. Anyone with a medium risk should be challenged with Multi-Factor Authentication (MFA) at sign-in. If the sign-in is a high risk, access should be blocked.
- Location: A location can be risky if it is in a country with limited security policies or if the wireless network is unsecure or simply because it is not a location where the organization typically does business. You can modify access requirements for sign-ins from locations that are not on an IP (Internet Protocol) safe list or that are risky for other reasons. Users accessing a service when they are off the corporate network should be required to use MFA.
- Device platform: Define a policy for each device platform that either blocks access, requires compliance with Microsoft Intune policies, or requires the device be domain joined.
- Device state: Use this condition to define policies for unmanaged devices.
- Client apps: Users can access many cloud apps using different app types such as web-based apps, mobile apps, or desktop apps. You can apply security policies if an access attempt is performed using a client app type that causes known issues, or you can require that only managed devices access certain app types.
- Cloud Applications: This condition specifies unique policies for sensitive apps. For example, you can require that HR (Human Resources) apps like Workday are blocked if Azure AD detects a risky sign-in or if a user tries to access it with an unmanaged device, or choose to protect SharePoint files, but not limit email.
Once those conditions are met, you then choose what policy to enforce, which typically alters allowed behavior, allows, or blocks access, or requires additional steps:
- Require MFA to prove identity.
- Change the actions the user can take in cloud apps.
- Restrict access to sensitive data (for example: limit downloads or sharing functionality).
- Require a password reset.
- Block access.
Microsoft even provides a great tool directly in the Conditional Access configuration portal called “What If?” allowing you to test out various conditions to see when your various policies will be applied. This is super useful when you have multiple CA policies running on one tenant, and you are trying to figure out what behavior will be met with any number of access scenarios.
But to truly understand how to use Conditional Access, I have found there is no substitute for rolling up my sleeves and just doing. Get in there and create some policies, do some testing, use trial and error. Just be sure not to lock yourself out! It is always best to test out new policies scoped only to a test user first.
The wizard that is made available for your use is straight forward, so let us walk through the creation of one of the most common CA policies that I see in use: creating an MFA login for all our users. To spice things up a bit, I want to allow users who are on my known network to not have to go through the trouble of using MFA. Let us say I have badge-based access, so any user who is at my company office already has gone through a more rigorous access process. But, when my users are not at work, and are at home or traveling, then I want to make sure I test for MFA.
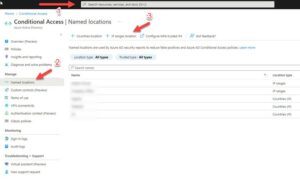
To start out with, let’s discuss where you can find the Conditional Access Policies inside of the Microsoft Cloud. You are going to be logging into the Azure Portal, commonly found at https://portal.azure.com (For commercial or GCC [Government Community Cloud]) or https://portal.azure.us for GCC-H (Government Community Cloud High) based on what cloud you are in. Once there, just search for the term “Conditional Access” in the search bar at the top, and the Icon for Conditional Access will show up. Click on it to navigate to Azure Blade, where you can manage your policies. I have indicated the area you can search with a 1 and red arrow in my first screenshot. Since I have the extra consideration in this example of needing to allow users who are at my office to bypass MFA, I know that I need to create a “known location” before I can complete my policy. I should do this first, and to do so I need to click on “known locations” on the left-hand navigation menu of the blade (indicated by a 2 on the screenshot) and then choose to add an IP based location (indicated with a 3.)
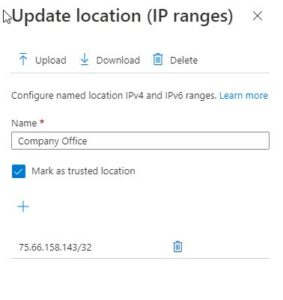
Once there, I just fill out the relevant details for my company’s network. The expected input would be a range of IPs (Internet Protocol). If you need help figuring out how you should format your own IP address, there are a bunch of friendly guides out there that can help in my case, I do not have a company office for my made-up company, so I am just going to use a made-up IP range. It is important for me to note at this time that there are some clear rules around what you can do with IP based named locations. Named locations defined by IPv4/IPv6 address ranges are subject to the following limitations:
- Configure up to 195 named locations
- Configure up to 2000 IP ranges per named location
- Both IPv4 and IPv6 ranges are supported
- Private IP ranges cannot be configured
- The number of IP addresses contained in a range is limited. Only CIDR masks greater than /8 are allowed when defining an IP range.
You will notice in the next screenshot there is an option for a “trusted location.” I have gone ahead and marked this in our example as it is my “company” network. A trusted location has two main purposes in Azure AD:
- Sign-ins from trusted named locations improve the accuracy of Azure AD Identity Protection’s risk calculation, lowering a user’s sign-in risk when they authenticate from a location marked as trusted
- You can select all “trusted locations” when creating a conditional access policy.
Selecting all trusted locations when creating policies can be helpful if you are working in a large environment or a distributed environment. I worked with a company out in Australia that had corporate offices in 7 cities. They had something like 22 unique offices. We could create IP-based locations for each office, mark them as a trusted location, then create our policies with all trusted locations. Like other variable based options in the cloud, this also makes these rules dynamic. If they were to expand and add in a new office, all I need to do is add in another Ip based location, mark it as trusted, and it would automatically have all the Conditional Access Policies I have specified to trusted locations.
Once that is done, I can move on to our actual policy creation! Select policies on the left-hand navigation menu (1,) and then new policy at the top (2.)
I am going to create new policy, which is the first option of the drop down. From there, a new page loads showing me the wizard I can use for creation. Remember our original ask: I want a policy that applies to all my users, which requires them to do MFA, unless they are in the office. I have labeled the steps we take through the wizard, but in short you just got top to bottom. It always takes a bit of practice and experience with this tool to know how you must configure the policy to do what you want, but let me walk you through how I would configure a policy to meet what we need:
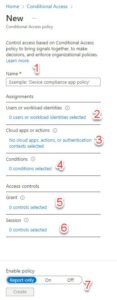
- Give your Policy a Name. I recommend something descriptive and if possible, a pattern you can follow. This policy will show up in logs and testing, so having an intelligent naming convention is a big plus.
- I am going to name mine in the following format: [Who are the Users]- [What applications are targeted]- [What is the condition]- [Any exceptions]
- All Users – All Cloud Apps – Require MFA – Except in the Office
- Select Users or workload identities. I again am going with All Users here
- Select Cloud Apps or Actions. I am going with All Cloud Apps
- Select I do need to do this. For me, the Condition is going to be location-based filtering, and I want to Exclude my Company Office Known Location I created before.
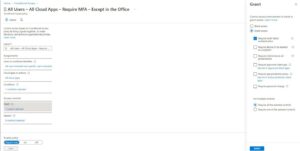
5. Selecting Grant under Access controls, I will grant access requiring MFA
6. I do not need to worry about session controls.
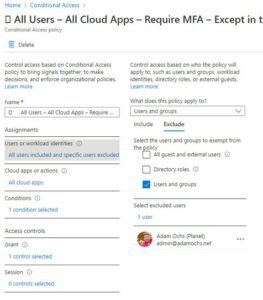
So, I now have my completed settings. Quick note, I did take my own advice in this blog, if you look, I have scoped the policy to exclude my Admin account. Better safe than sorry when testing with this stuff, so I am going to be scoped to “All Users” except my one admin account (to make sure I do not mess up and lock myself out)
Now that I have created the rule, I can use the handy “What If” tool to test if it is configured correctly. I simply go back to the top of the policies tab, and this time choose “What If.” Now I need to run two tests here. One, with the IP of my known location, which was my “office.” Now I made up this IP address, but I have left it un-blurred in my photo so you can see the test. I simply grab that IP and run the what if test with details filled in about a hypothetical user, in our case my colleague Angel.
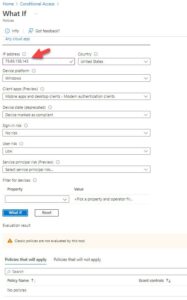
*Note the IP listed here in this test is the same as the known location IP I used earlier.
So, the test comes back saying no policies will be enforced. This is exactly what we want! The policy we created enforces MFA on all users if they are not in the office. So, if they are in the office, that policy should not apply. To test that this is true, I next need to test with any other IP address, if it is not in my “Company Office” known location.
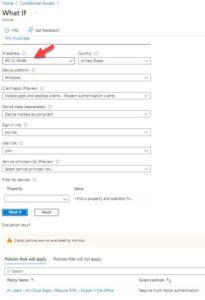
*Note here, the IP address is different from my Company Office IP used earlier (I also randomly made this one up)
Success! As expected, now that another IP is listed, the policy we made is now in play. So, my user Angel when logging in from the company office now gets in straight away, but when logging in from somewhere not in the company office, he will be required to do MFA.
This is just one example. A full-fledged Conditional Access Deployment has multiple policies in play enforcing options around everything from locations, app-based filtering, different rules for different people in the company, risk-based logins, and so much more. As an example, one State Government my team worked with in the last year had over 50 policies created they wanted reviewed. We were able to streamline and combine many of them down, but at the end of our cleanup exercise, they still had over 15 policies that were active on account.
If you would like to know more or want to see an overview and technical assessment of some of my favorite Conditional Access Policies, join us for our “You Already Own It” session on May 26, 2022. I will be going over everything you need to know to fully utilize Conditional Access policies in your environment today. The session is designed for people just starting out, or for those of us who have not revisited our own organization’s CA policies in the last year or two. We will cover Licensing and Permission requirement, conditional Access design decisions and best practices, common policies in use today for our Government and Security minded partners, and the cutting-edge options being leveraged.
